Difference between revisions of "SSH"
(Created page with "SSH (secure shell) is a secure method of logging into another computer over the network, and is the only way to access the various SHARCNET machines. It is usually installed...") |
|||
| (5 intermediate revisions by the same user not shown) | |||
| Line 114: | Line 114: | ||
[[Image:putty_initial.png|center]] | [[Image:putty_initial.png|center]] | ||
Enter the full host name of the | Enter the full host name of the cluster to connect to in the ''Host Name'' box (e.g., ''graham.computecanada.ca'') and click the ''Open'' button. If this is your first time connecting to the cluster, you will get the unknown key window | ||
[[Image:putty_newkey.png|center]] | [[Image:putty_newkey.png|center]] | ||
| Line 124: | Line 124: | ||
[[Image:putty_terminal.png|center]] | [[Image:putty_terminal.png|center]] | ||
Once you enter your SHARCNET user name and password you will be presented with a shell prompt where you can enter commands. (If you don't want to type your password every time you connect to our clusters, see the section [[#Using ssh keys]] below.) | Once you enter your SHARCNET user name and password you will be presented with a shell prompt where you can enter commands. (If you don't want to type your password every time you connect to our clusters, see the section [[#Using ssh keys]] below.) | ||
=== Transfering Files === | === Transfering Files === | ||
| Line 132: | Line 132: | ||
[[Image:winscp_initial.png|center]] | [[Image:winscp_initial.png|center]] | ||
Enter the full host name name of the | Enter the full host name name of the cluster to connect to in the ''Host name'' box (e.g., ''graham.computecanada.ca''), your SHARCNET user name and password in the ''User name'' and ''Password' boxes, and click ''Login''. (If you don't want to type your password every time you connect to our clusters, see the section [[#Using ssh keys]] below.) If this is your first time connecting to the cluster, you will get the unknown key window | ||
[[Image:winscp_newkey.png|center]] | [[Image:winscp_newkey.png|center]] | ||
| Line 183: | Line 183: | ||
chmod 600 ~/.ssh/authorized_keys | chmod 600 ~/.ssh/authorized_keys | ||
chmod 700 ~/.ssh | chmod 700 ~/.ssh | ||
wc ~/.ssh/authorized_keys | wc ~/.ssh/authorized_keys | ||
====Configuring Pageant ==== | ====Configuring Pageant ==== | ||
| Line 276: | Line 265: | ||
====WinScp==== | ====WinScp==== | ||
WinScp.exe (the file copy utility; see [[#Transfering Files|above]]) also works with pageant.exe, by default. You simply launch WinScp, and type in the address of the cluster (e.g., orca.sharcnet.ca), your login name, and then click on "Login" - you will be connected to the cluster without been asked for a password or a passphrase - as long as pageant.exe is running. | WinScp.exe (the file copy utility; see [[#Transfering Files|above]]) also works with pageant.exe, by default. You simply launch WinScp, and type in the address of the cluster (e.g., orca.sharcnet.ca), your login name, and then click on "Login" - you will be connected to the cluster without been asked for a password or a passphrase - as long as pageant.exe is running. | ||
Latest revision as of 11:40, 3 September 2021
SSH (secure shell) is a secure method of logging into another computer over the network, and is the only way to access the various SHARCNET machines. It is usually installed by default under Linux and OS X (Mac). A free versions can be downloaded for Windows machines.
Linux, Mac and Cygwin
Under Linux ,OS X (Mac), and Windows Cygwin the OpenSSH commands (ssh, sftp and scp) should be available on the command line.
Public Key Authentication (PKA) between MAC and SHARCNET clusters
You won’t have to type your password when connecting to any SHARCNET cluster when doing something over SSH, such as: ssh, sftp, scp, rsync, and secure port forwarding. Follow these instructions to install the Public Key Authentication (PKA) on your MAC:
 On the MAC:

 From a terminal window on the Mac, go to subdirectory .ssh and do command:

     ls -lat

 Start by generating your personal set of keys:

     ssh-keygen -b 2048 -t rsa

 Then, when prompted, hit enter three times. Check it by doing command:

     ls -lat

 You should see two new files: “id_rsa”, and “id_rsa.pub”.
On the remote SHARCNET machine:

 You must log into the remote SHARCNET machine using the standard ssh method. In your
 account’s home directory, create a new directory named “.ssh”, if it doesn’t already exist:

     cd
     mkdir .ssh

 Make sure that directory .ssh is accessible only to your account:

     chmod 700 .ssh
Back on the MAC:

 Open another Terminal window, and navigate to the .ssh directory in your Home. Secure copy
 your “id_rsa.pub” key file to the remote SHARCNET server, providing the remote server’s user account
 password when prompted:

    scp  id_rsa.pub username@remoteserver:/path/to/home/.ssh/

 Specific example:

    scp  id_rsa.pub nickc@hound.sharcnet.ca:/home/nickc/.ssh/

 Keep this Terminal window open after the file has transferred. We will use it to test
 the public key authentication (PKA) procedure, to ensure it has been activated properly.
Back on the remote SHARCNET machine:

 Drop into your .ssh directory:

     cd
     cd .ssh

 If you have a “authorized_keys” file do following command:

     wc authorized_keys

 to see how many lines you have in that file.

 You should see in subdirectory .ssh the id_rsa.pub file you just uploaded. Now, add its
 contents to a file named “authorized_keys”:

     cat id_rsa.pub >> authorized_keys

 If the “authorized_keys” file doesn’t exist, the command will create one for you, and if
 the “authorized_keys” file already exists, the command will simply add the info from your
 public key to it.

 Issue commnd wc again to see the number of lines in file “authorized_keys”:

     wc authorized_keys

 Now, log out of that SSH session from the remote SHARCNET machine.
Back on the MAC:

 Connect to the remote machine again using SSH. If all went fine you should not enter any
 passwords or passphrases this time, since public key authentication (PKA) has been activated.

 Also try: sftp, scp, rsync.
Windows
You can run the command line OpenSSH as on Linux and MacOS if you want by installing the entire Cygwin tool set for Windows or just OpenSSH recompiled for Windows. You can also use the graphical PuTTY and WinSCP programs or the old non-commercial version of SSH Secure Shell for Workstation.
PuTTY and WinSCP
SHARCNET recommends downloading and installing the graphical PuTTY SSH suite along with the WinSCP program based on it. We strongly recommend to generate and use ssh keys (using the programs puttygen and pageant, which are available on the Putty web site) to connect to our clusters (instead of using passwords) - this is both more convenient (you don't have to type your password every time), and much more secure (hackers won't be able to sniff out your password). See the section #Using ssh keys below.
Installing
Download the windows putty installer from the PuTTY homepage (click the download link and pick the installer) and the WinSCP installer from the WinSCP homepage (click the download link and pick the installation package). Note that the WinSCP installer will ask about installing a Spyware Terminator. This is not recommend as it is not required to access SHARCNET systems.
Logging In
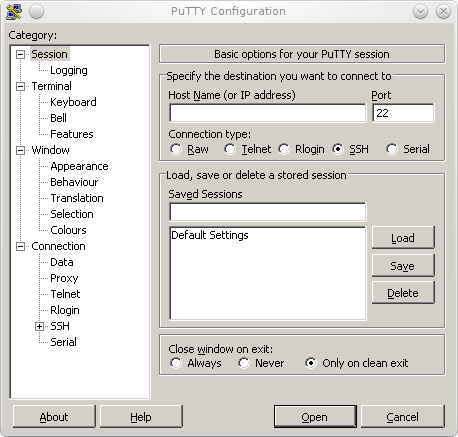
Run PuTTY from Programs PuTTY on the Start menu. This will open up PuTTY connection window
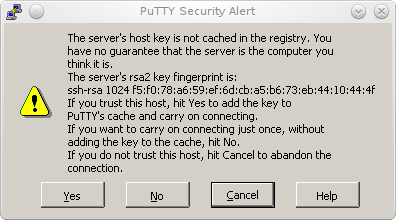
Enter the full host name of the cluster to connect to in the Host Name box (e.g., graham.computecanada.ca) and click the Open button. If this is your first time connecting to the cluster, you will get the unknown key window
You can pick Yes to store a copy of the servers key. Your system will then store a copy of the server's key and only warn you next time you connect if the key has changed. If you do see a message in the future about the stored key not matching, it could theoretically mean someone was spoofing being our server in order to collect your password, but more likely means we updated our system without preserving our old key.
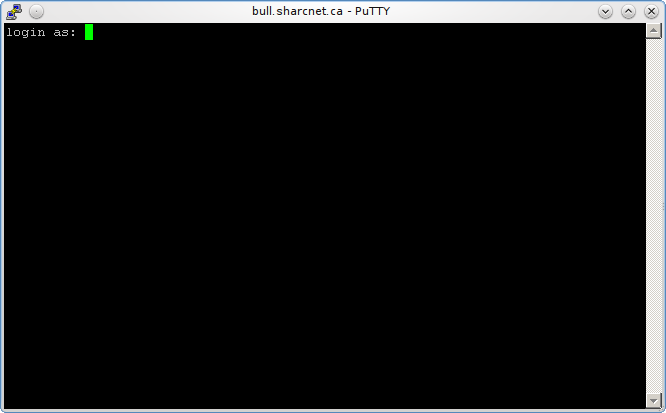
This will then open a terminal connection to the login node on the desired SHARCNET cluster
Once you enter your SHARCNET user name and password you will be presented with a shell prompt where you can enter commands. (If you don't want to type your password every time you connect to our clusters, see the section #Using ssh keys below.)
Transfering Files
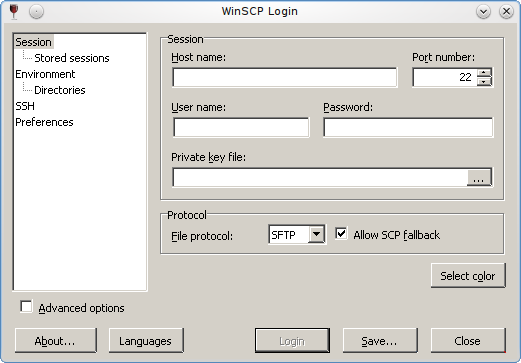
Run WinSCP from Programs WinSCP on the Start menu. This will open up WinSCP connection window
Enter the full host name name of the cluster to connect to in the Host name box (e.g., graham.computecanada.ca), your SHARCNET user name and password in the User name and Password' boxes, and click Login. (If you don't want to type your password every time you connect to our clusters, see the section #Using ssh keys below.) If this is your first time connecting to the cluster, you will get the unknown key window
You can pick Yes to store a copy of the servers key. Your system will then store a copy of the server's key and only warn you next time you connect if the key has changed. If you do see a message in the future about the stored key not matching, it could theoretically mean someone was spoofing being our server in order to collect your password, but more likely means we updated our system without preserving our old key.
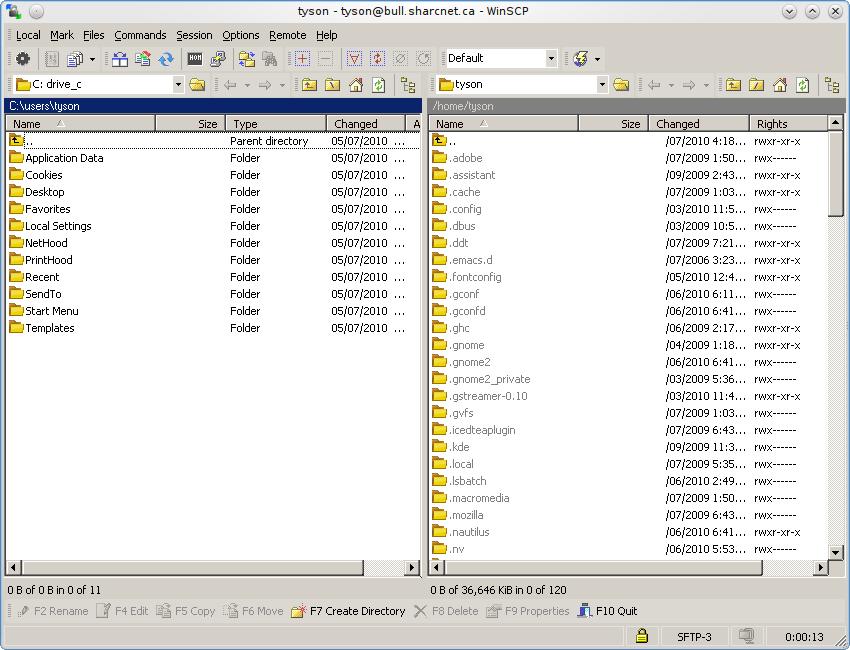
You will then be presented with a side-by-side listing of your files on your computer (on the left) and the SHARCNET system you connected to (on the right).
To copy files around, drag and drop between the left and right panes. A file that starts with a period is considered to be hidden in UNIX and will not be displayed in a terminal by the ls command unless the -a (all) flag is used.
Using ssh keys
For convenience, and for security reasons, we strongly recommend using ssh key authentication instead of a password to connect to our clusters. It can be done under Windows using two more putty executables (available from the Putty download page) - puttygen.exe and pageant.exe. Download them into the same folder as the other putty binaries (putty.exe). Make sure to download "A. Windows installer for everything except PuTTytel" which is half-way down the download screen.
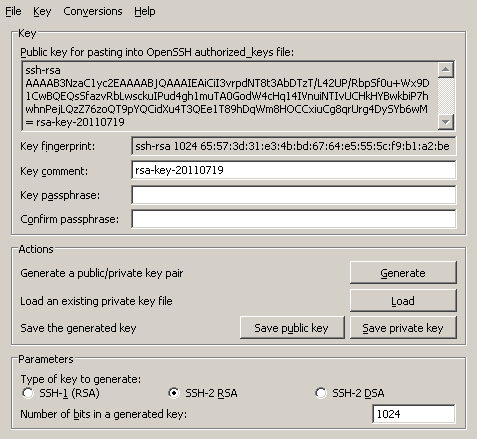
To generate an ssh key pair, execute puttygen.exe. You'll be presented with this window:
Next, you press the "Generate" button. The program will ask you to randomly move the mouse cursor around. Once it's done, the key pair will be generated, and you will see something like this:
Then you have to come up with a passphrase - something you can remember, but something which cannot be easily guessed. It doesn't have to be a single word - it can be a phrase, with spaces. Please don't use your SHARCNET password as a passphrase! And please choose a passphrase (don't leave the fields blank) - this is important for security.
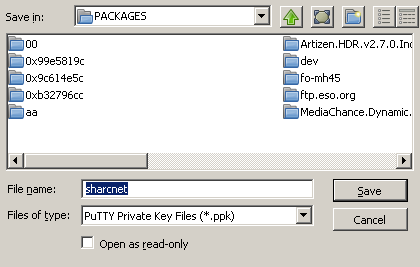
After that, you should press the button "Save private key" - choose some appropriate name (e.g., "sharcnet.ppk"):
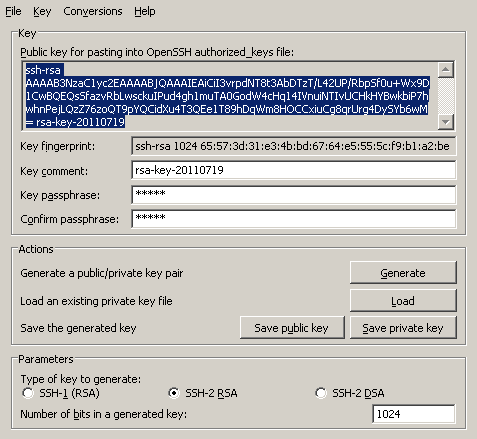
Finally, using your mouse, highlight the content of the window "Public key for pasting into OpenSSH authorized_keys file",
copy it (Ctrl-Insert), and paste as one line at the end of your ~/.ssh/authorized_keys file on SHARCNET: simply login to SHARCNET using your ssh client (putty.exe), execute "mkdir -p .ssh && cat >> .ssh/authorized_keys", press "Shift-Insert" to paste the key to the file, and then press "Return" once and finally press "Ctrl-d". You should make sure this file has proper permissions, by executing "chmod og-rwx .ssh/authorized_keys".
At this point, you have created a matched pair of ssh keys - one is private, and is residing on your Windows computer (*.ppk file; please don't copy it to SHARCNET, and don't share it with anyone!); the second is a public key, which you pasted as one line in the ~/.ssh/authorized_keys file on the remote SHARCNET cluster.
Permissions of public keys
The public key generated by PuTTygen must be placed in the "authorized_keys" file and satisfy the following conditions:
     (1) The file name must be "authorized_keys"
     (2) the file "authorized_keys" can contain one or more public keys
     (3) but each public key must be one line
     (2) additional characters can be appended to the end of the public key in each line
     (3) permissions of file  "authorized_keys" must be set to octal 600 (rw- --- ---)
     (5) the "authorized_keys" file must be placed in subdirectory  "~/.ssh"  on the remote host
     (6) the permissions for the subdirectory "~/.ssh" must be set to octal 700 (rwx  --- ---)
If above conditions are not met the public key authentication will fail. To verify/set these conditions use following commands:
     chmod 600 ~/.ssh/authorized_keys
     chmod 700 ~/.ssh
     wc ~/.ssh/authorized_keys
Configuring Pageant
Pageant can be loaded on demand or can be setup to load when you start Windows.
When Pageant is not running ...
... you can execute the program "pageant.exe" from Windows as follows:
Click on Start and select "All Programs"
 locate PuTTy and move cursor to the right and select Pageant and click on it
If you get a small "Pageant Error" icon with the message "Pageant is already running" then click on OK and go to the next subsection "When Pageant is running ...:
Otherwise it will immediately become an icon:
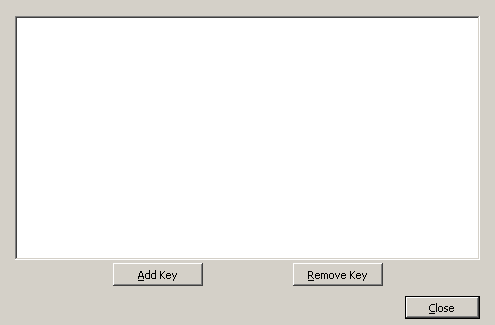
Double-click on the icon to get this window:
Then press the button "Add key", and choose the ppk file you created with puttygen.exe (see above). It will ask for your passphrase - enter it now. Then press "Close", and you are good to go. As long as the program runs (stays as icon), you can use putty.exe to login to our clusters, and you will not be asked any passwords (or passphrases).
When Pageant is running...
... it means that pageant.exe has already been set up to execute automatically every time you restart Windows - and most probably with an empty passphrase so you do not need to provide the passphrase when you restart Windows.
To have Pageant start up and load the key automatically whenever you log into your Windows desktop we need to create a shortcut in your Startup folder as follows:
Go to the Startup folder by right-clicking the Start button, select Open, double-click on the Programs folder, then double-click on the Startup folder. Inside the Startup folder, right-click and select New -> Shortcut. In the "Type the location of the item" text box, enter the full path to the Pageant program followed by the full path to the key file.
For example,
"c:\program files\putty\pageant.exe" "c:\documents and settings\esumbar\pka-putty\mykey.ppk"
Click Next. Enter "mypageant" (or a name of your choice) in the "Type a name for this shortcut" box, then click Finish.
You can also add the option -c to the "Type the location of the item" text box, followed by an argument which is the pathname of an executable.
If -c and argument are included - it means that the executable (argument) will be executed next, i.e. once pageant.exe terminates.
Example: If following is entered into the "Type the location of the item" text box:
"C:\Program Files\PuTTY\pageant.exe" "C:\Documents and Settings\Nick.DAISYLAND\My Documents\SHARCNET\private.ppk" -c "C:\Program Files\PuTTY\putty.exe"
then pageant.exe will add the private key pointed by the second full path to the key file and after that the program putty.exe will open up the folder "C:\Program Files\PuTTY" for the user to select one of the executables in that folder.
Next time Windows is restarted the key embedded in the shortcut will be loaded automatically and in this case putty will be started since we had "-c and argument" included !
You will be asked the enter the passphrase only when Windows is started.
Configuring a PuTTy Saved Profile which uses agent forwarding
Once you connect from Windows to a remote server and your keys are loaded automatically you will not be required to enter the passphrase. If you like to make a new connection from this server to another server and avoid passwords and passphrase then you need to use "agent forwarding". Following instructions show how this can be accomplished and also how to save this session in PuTTy so next time you are not required to set these options again:
     click on the PuTTY icon and select "Session" on left side
     Enter in the Hostname or IP, etc ... on right side
     Enter a name in the "Saved Sessions" field
     Under Connections -> SSH -> Auth    click on Auth
     and Check "Attempt authentication using Pageant"
Under "Session" Click Save
double-click on Open to start connection
Next time all you need is to "Load" the name in the "Saved Sessions" field that you saved in PuTTy.
WinScp
WinScp.exe (the file copy utility; see above) also works with pageant.exe, by default. You simply launch WinScp, and type in the address of the cluster (e.g., orca.sharcnet.ca), your login name, and then click on "Login" - you will be connected to the cluster without been asked for a password or a passphrase - as long as pageant.exe is running.
